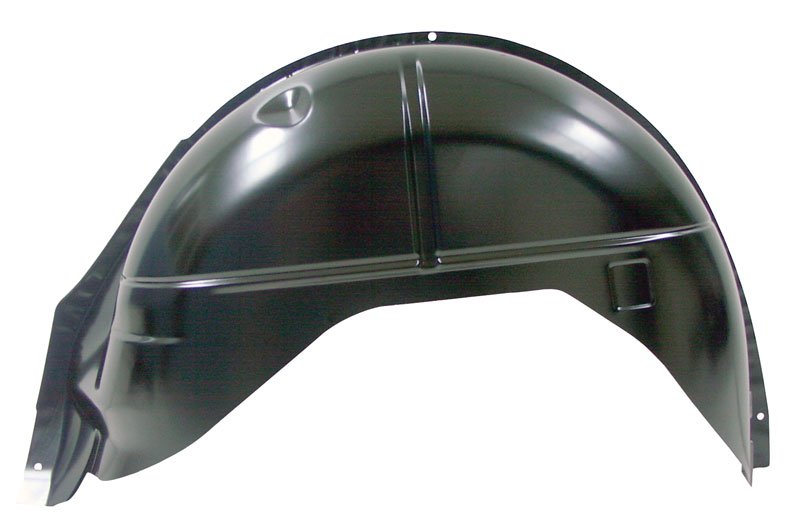
Direct-replacement inner left wheelhouse for 1970-1972 Chevrolet Chevelle Convertible that restores the wheelwell area to original fit and function. Designed to replace rusted or damaged inner wheelhouse panels, it restores structural support, corrects quarter panel and trunk alignment, and protects the trunk from road debris and moisture. Stamped to match OEM contours for a precise fit and finished for durability, this wheelhouse is ideal for restorations and rust-repair projects.
Features:
- Fits 1970-1972 Chevrolet Chevelle Convertible (left / driver side inner wheelhouse).
- Stamped heavy-gauge steel engineered to match OEM contours for a near-stock fit.
- Restores structural integrity, supports trunk floor and quarter panel alignment.
- Protects trunk area from moisture, road debris, and further corrosion.
- Designed for restoration and replacement applications — durable and long-lasting.
- Simplifies installation with factory-style mounting features and alignment points.
Installation / Application:
- Difficulty: 3/5
- Estimated time: 2-4 hours (shop time; varies with rust extent and welding experience)
Instructions:
- Prepare the vehicle: disconnect the battery, raise and support the vehicle safely, remove the wheel and any interior trim or liners that obstruct access to the inner wheelhouse.
- Assess and mark: inspect the existing inner wheelhouse and surrounding structure, mark cut lines to remove all rusted or damaged metal while preserving as much good metal as possible.
- Remove old panel: use a spot-weld cutter or drill out spot welds and an angle grinder to cut away the damaged inner wheelhouse; clean and prepare adjacent panels for welding.
- Test-fit the new panel: position the replacement inner left wheelhouse and check fitment against factory mounting points, trunk floor, and quarter panel. Trim for clearance if necessary.
- Align and clamp: align the panel, using clamps and backing supports to hold it in proper position and ensure OEM contours match surrounding panels.
- Tack weld: tack weld the panel in place at multiple points to maintain alignment; re-check fitment and gaps as you progress.
- Final welds: complete stitch or seam welds according to shop practice, avoiding excessive heat build-up to prevent distortion. Grind welds smooth where needed.
- Seal and protect: apply seam sealer to welded seams and joints, then coat bare metal and weld areas with rust inhibitor/primer.
- Finish: apply topcoat or undercoating as required for corrosion protection and sound deadening, restoring the original appearance of the trunk/wheelwell area.
- Reassemble: reinstall wheel, liners, trim, and any removed components; lower vehicle, reconnect battery, and perform a final inspection for fit and finish.
Vehicle Fitment:
The Vehicle Fitment Guide is to be used as a general reference. The data has been provided by our suppliers and manufacturers and may contain errors or incorrect data. Always refer to a professional to verify correct fitment for your vehicle.
| Make |
Model |
Years |
| Buick |
GS |
1970 - 1972 |
| Buick |
Skylark |
1968 - 1972 |
| Buick |
Special |
1968 - 1969 |
| Chevrolet |
Chevelle |
1968 - 1972 |
| Chevrolet |
Monte Carlo |
1970 - 1972 |
| Oldsmobile |
442 |
1968 - 1971 |
| Oldsmobile |
Cutlass Supreme |
1968 - 1972 |
| Oldsmobile |
Cutlass |
1968 - 1972 |
| Pontiac |
GTO |
1968 - 1972 |
| Pontiac |
LeMans |
1968 - 1972 |
| Pontiac |
Tempest |
1968 - 1970 |